December 30, 2012

Now showing...

Thank you for the sunlight Valerie! It got here yesterday and it seems like today is going to be bright as well ;)
Yesterday, I quickly took some pictures of my latest creations to show them. Unfortunately, I was a bit hasty (among other reasons because I didn't know how long the light would last) so I didn't iron the yellow skirt as well as I should have (note too self: the wardrobe is too full if skirts get wrinkled from hanging there...although it doesn't show in these pictures) and I didn't make an effort to coax my too long fringe into anything resembling a decent hair-do and I could have spend some more time trying to pull a nicer face when posing... Oh well, it's the clothes I wanted to show off.


First up: a top and skirt. The skirt is a re-make of a mustard coloured pencil skirt I've made two years ago. The original skirt was the only casualty of the recent moth scare (a tiny hole at the hip. M said I could fix it but in this smooth fabric, I didn't think it would work. And I still had 3 meters of fabric left in my stash) and I have always been a bit self-conscious about just how snug it was at the hip. It work ride up when I walked and not fall down again on its own... Like all my skirts, it was based on a skirt sloper I made with M but it was the only one which really gave me this trouble. It guess it's down to the combination of a classic but somewhat demanding design and a mercyless fabric. Anyway, I made a second straight skirt sloper. This one with a loosely taken hip measurement so the end result would skim my hips, rather than fit them firmly (I kept the old sloper as well, for something like cotton twill, that one is better).


The sweater is very simple, it's my third time using this basic shape. A simple, loose fitting, litterally T-shaped affair. This one has a very simple straight neckline, with one tuck stitched down at center front. The sleeves are as long as I could make them and still cut front and back next to each other and I added long cuffs. 
The fabric is a thin jersey with a fairly fine stripe. It thought it was black and white but on closer inspection, the dark stripes turned out to be dark blue. I bought 'what was left on the roll' very cheaply without knowing the fibre content but after wearing I believe this is wool jersey. Yes!!
The stripes are a bit of a challenge. I spend a lot of time trying to cut the pieces so the stripes would match but it's a very shifty sort of material. Matching didn't work at the sideseams or at the seams of the cuffs. It did sort of work at those long shoulder/upper arm seams which are the most visible. So I'm happy with that. 
I like the vaguely 30's vibe of this top when it's worn tucked in like this.

Then, still procrastinating while I could have been working on E's coat, I made another top. Here, I also used a tried and trusted shape, this one for the third time. Like on the previous one, I cut the back on the fold and made a center front seam. I changed the collar and the placement of the bust dart. Both earlier tops had a long bust dart coming up from the waistline, here I went for another 1950's favorite: a pleat at the neckline. It is usually used with either a cut-up collar (like I did here) or a shawl collar of some sort. 
I like how the top turned out but because of it's colour, a sort of grey-purple, I don't think it will become as much of a wardrobe staple as it predecessors.

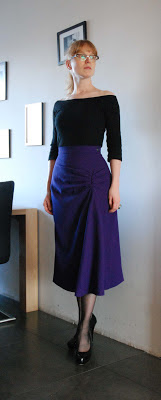
And, last but not least, here is my real new skirt:


The design was one of a trio of show-y skirts I sketched at least a month ago. All of those could be made from stash fabrics, so I think you may get to see the others made up in new year. For this one I used some of the 4 meters of mystery fibre (I think wool and polyesther) bright purple crepe. This is the exact same colour and texture I used before for a dress and skirt but this fabric is slightly thinner. 


I used the new 'gently skimming the hips' skirt sloper and altered the front to include tight gathers at the front of the left hip and a wide godet which flares out below those. Of course, both skirts are lined and both are a bit longer than my skirts from previous years. I guess all that deliberation on skirt length got to me in the end... On a skirt like this, I really think you need the length, and the high waistline, to make the design work. This one is 75 cm from waist to hem.  

Now, I really have to get back to cutting the lining for E's coat. 

December 28, 2012

Nothing to show

Hi everyone! I hope you've all had a good time over the Holidays.
I've been putting off this post for a couple of days now. Basically, I have plenty to show you: I tweaked the coat design for E a bit more and am now ready to cut into the real fabric and I made two tops and a skirt, well actually, two skirts.  
However, the weather has been very uncooperative. It isn't cold at all but so very cloudy. All day, every day. I just haven't had enough light for half-way decent pictures. I'll show you all the good stuff as soon as possible, I promise.

About the coat: I had to take it in at waist and hips a bit more and then I discovered a weird fit issue at the shoulder which hadn't bothered me before. In the end, I think that was just proof of my ever more critical eye: the existing coat showed the same drag line from neck to armpit (which is often caused by a too tight back neckline and/or armscye, but not in this case). I finally tried a small shoulder pad and that solved all the remaining fit-issues: those drag lines,  a slightly too tight chest area and the range of movement provided by the sleeves. 
I was really suprised to get that much result from so small and easy a fix. I guess that teaches me... Now, I will only have to do some minor surgery on the right pad to compensate for dear E's uneven shoulders.

December 20, 2012

Coats again...

Once more, I have coats on my mind...
Not for me this time though. For the man in life.
I made this coat for him in September 2010 and he has only worn it just about all the time in the two winters since then. I replaced the lining last spring but, apart from some hard to remove stains, it's still going strong. 
Nevertheless, I thought it was time to make him another one. Using the same fabric of which I still have a good 3 to 4 meters in stash. 
He said he would wear the old one to work and keep the new one as his 'good' coat.
I started thinking about it last winter and I planned for something very similar in shape to the previous one, just with a rib-knit collar (the first sketch, top left). I just couldn't find an appropriately thick rib knit so I postponed until autumn. 

By now, having recovered from a spell of low sewing mojo, I was looking differently at this coat idea. Then, E requested something which would look right when seen next to my new coat...
So, why not make something a little bit more classic, less casual. Like a double breasted coat, vaguely sailor-y (top right sketch)? 
E sort of approved the sketch but wanted buttons at the sleeve.
Considering the back, I was reminded of the interesting design lines of 19th century menswear. The shoulder seams angled far to the back from a 'normal' starting point at the neck, side seams set far into the back, almost shaped like back princess seams...

Like this example from the book 19th century fashion in detail.
I planned to keep the basic shape I made before but incorporate the details I just mentioned.

Of course, I was going to make a muslin for the bodice. When drafting that, I decided on a whim to make the whole thing 15 cm longer than before and to include a center back slit. 
E and I both liked the new length of the coat, to about mid-thigh. We didn't like just how straight and shapeless it looked. 
I then went one step further with the 19th century influence: A horizontal seam in the front and side panels (last sketch). It will be ideal for making pockets and it allowed me to shape the waist a bit more without making it very obvious nor in any way (at least, I hope and think so) feminine. The front and side back 'skirt' are one piece which is ever so slightly flared. The upper pieces are seperate, so there is a sideseam there, which I took in 1.5 cm at the 'waist'line on each(sloping to nothing at the armscye). 
Unfortunately, I didn't take pictures of any of the fitting sessions so far so you will have to rely on my crappy sketches for now. I still have to draft a collar and consider button and pocket placement. I still kind of hope to get it done before the New Year...

December 16, 2012

As seen

 This week, I finally made my way to the Fabolous Fifties Fabulous Fashion exhibit at the Gemeentemuseum Den Haag.
To be perfectly honest, I was a little bit disappointed with the (lack of) size and scope of the event. Sure, there were lots of nice things, but I'm pretty sure the museum has more and the choice the create themed rooms sort of blurred the developments during the era. And although I loved the fact that they paid attention to the importance of home-made fashion and sewing patterns in the 1950's, I thought it was really odd to show only Vogue and Butterick envelopes. Instead of Marion and any number of Dutch ladies' mags, that is (I think some kind of endorsement deal may be behind this). 
That all said, I may well hyper-critical because this is an era of fashion history I know well, and love.  

What I wanted to talk about in this post is how well some garments in the exhibit tied in with things we, in the sewing blogoshere, all know and love. My apologies for the poor quality of the pictures, I didn't bring my camera and used my phone (the Gemeentemuseum allows you to take pictures, as long as you don't use either flash or a tripod).

Of course, there were some designer favorites. That satin one, second from the left, is a Dior, the tule an lace number right from it Balenciaga.

But let's get on with the issue at hand. This dress reminded me of the Vintage Vogue 8728 (a reproduction) dress Erin was obsessed with about a year ago. It's not the same, but the two share some characteristics.


And who can look at a selection of vintage bathing suits without being reminded of Peter's quest to make one for his demanding model-cousin?

Here you can see what I told about attention given to sewing. In this room there were eight dresses, four in each window. Some were designer originals, some were copies made by licenced companies and some were home-made using designer patterns. And paper pattern stuff is used throughout as decoration.
In this picture, from left to right, the first one is home-made, the second one is Givenchy and the third was made by a Dutch company which had bought a licence for this design. I don't remember who originally designed 1 or 3 or what 4 was.

This dress was in the other window of the 'couture and home-sewing' room. Again, I don't recall the provenance of this particular garment, but its design must have started as a creation from some French designer. Just look at that bodice, those unusual... disappearing lapels. Who ever said Pattern Magic is always entirely original?

I had a lot of fun with this little 'see and recognize' game, almost as much fun as I had collecting inspiration and thinking up myriad ways in which this exhibition could have been even better... I hope you enjoy it too!

December 14, 2012

Suspense

The Americans among you may not know this, but the contraptions worn to keep up classic stockings (those without sticky plastic at the top) you may know as "garter belts" are known to the English as "suspender belts". 
Cheap versions of these are often sold at big chain lingerie stores around Valentine's Day and, weirdly, Christmas. Those will typically have four plastic clips. If you're really interested in wearing stockings, you'll want a more serious version, with at least 6 straps and and metal clips (sold at places which specialize in stockings or vintage lingerie. I'm not showing pictures from these sites here because they are quite obviously showing women in lingerie and I don't want to offend anyone or get anyone into trouble where-ever they might be reading this blog). Or, probably even more in vintage style, you could try some kind of girdle (according to my vintage magazine research, suspender belts were mostly worn by teenage girls with grown-up ladies opting for girdles or full-length corsets).
I've occasionally worn suspender belts and stockings under sufficiently wide and long skirts for a few years. In fact, when I threw out an old belt last year, I cut off the straps so I could make my own version. I just didn't get around to it yet.


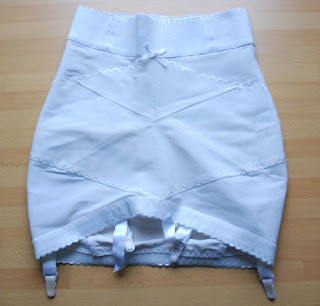
Also a while ago, I picked up this thing at the second hand market stall. I don't know how old it is, but it's definately a girdle. Wide elastic waistband boned in three places, powernet front and sides layered in some areas for extra compression, a non-stretch center back panel and four suspenders.

I tried it on once... It sort of fits me but I nearly took the skin of my thighs to get into it and then made the foolish decision to try and take it off by pulling it up... This may work for skirts with short zippers (if you're a bit pear-shaped like me) but this stretch material which only ever wants to pull in tighter... I don't quite remember how I finally managed to get it past my breasts and arms and shoulders but I know I considered cutting it up.


And yet, girdles were worn for so long and are still sold at those vintage lingerie places. Surely there'll be some benefit to them? 
And I had 8 suspender straps in my stash...

So, I made a 'light' girdle. The shaping at the sides is based on my lingerie bottom sloper, the length and placement of the straps on the vintage thing. I actually have some powernet but I decided to use lycra now (I don't actually feel the need to compress my hips anyway). 

The 4 cm wide waistband elastic is boned at center back and at two places on the front. I sewed the boning pieces to the inside and covered them with velvet ribbon. 

It's easier to put on than the vintage powernet girdle, but it's still a bit of a struggle. If I ever make a powernet version, it won't be a pull-on style like this. Once it's on, the girdle stays in place rather well and the elastic doesn't bend in on itself. Surprisingly, the four suspenders seem to do a good job at keeping stockings up. I think the fact that, with their very short straps, they can't move about helps a lot. 

I didn't think I would model something like this here but looking at it in the mirror, I thought there was no harm in it ;)


Basically, a girdle is like a tight micro-miniskirt which also holds your stockings...

December 10, 2012

To smock

As you may have noticed, I'm a pretty accomplished seamstress. Of course, that doesn't mean I can do everything, clothes-making wise. And I've just begun to learn something new: smocking.

Some months ago, I brought wool and this pattern (from Margriet magazine from 1950) to my grandmother who had kindly volunteered to knit me another sweater (the first one was from a modern Phildar pattern). 
She found the pattern easy to follow and didn't mind the small gauge but she was worried about one thing: the page with the schematic drawing for those smocked bits was missing. She first gave the completed sweater front to my mother, who passed it on to me. 
I had never smocked in my life. Fortunately, she'd given me a little booklet (in German) on this technique a couple of years ago (in a bag of her old sewing supplies). With the help of this page, I managed to make this:

I know it doesn't look quite the same as in the picture but, believe me, the amount of stitches and their spacing are right. To get this, I basted at every two stitches. I also tried basting at every three which made the smocking look more like the picture but took up a lot more space on the shoulder than it should. The way it is now, the width (both in resulting width and in amount of stitches used) and placement are about right. 
Once I got the hang of it, this basic smocking wasn't difficult at all.

The booklet also contains a lot of information about decorative stitches and how and where you can use them.

Although I don't care for the heirloom baby girl look mostly associated with smockwork, I am tempted to try and use it in some way...

December 9, 2012

Blast from the past

I saw this picture in my book of 1951 Beatrijs magazines and I thought this would be a great one to share with you. I should add that it's not typical for images in this publication.


Beatrijs used its back cover for pictures (they did this in 1941, 1951 and 1954, so I guess it was a long-standing habit). These could be seasonal (little girls picking flowers), religious (a nun at a window, Beatrijs was a catholic magazine after all) or cute (small child with toy) but mostly, they were full page fashion pictures. 
In the 1950's 'edgy' posing hadn't been invented yet. Models tended to be narrow waisted but healty women in their mid twenties who positioned their bodies in natural or elegant ways, depending on the type of garment they were wearing. They were always perfectly groomed and their poses seem designed to display the garment clearly and accurately. 
That is where this image is different. Bearing the simple title of "striped in black and white" is does show an elegant lady, wearing a diagonally striped swagger to perfection. However, between the loose style of the coat and the stripes all you really see of the lady is a little bit of face and a pair of ankles in cuban heel stockings. This, in itself, gives the image an unusual, graphic quality but there is another unusual element as well. At the right side of the page, you can see (Oh, please ignore the weird line above it, that's a tear in the paper) the nose of a car. It's a little out of focus and yet, instantly recognizable, even today: it's a Volkswagen Beetle.
The Beetle was (I learned from Wikipedia) first designed in the late 1930's but real production started after the Second World War, making it available in Europe in the late 1940's (although it wasn's sold in the UK until 1953). It owed its lasting popularity to its reliability and sturdiness but also to the iconic advertising campaigns made for it (mostly in the US) in the 1960's.
I was aware of that last fact. To be honest, I was so well aware of the popularity of the Beetle in the 1960's that I wasn't even sure it could have been around in the early 1950's. That's why I looked it up in the first place.
With that particular power of hindsight, that makes this fashion picture incredibly fashion-forward for 1951 and maybe even a touch futuristic...

December 7, 2012

Check mate

Thank you for all the nice comments on my coat!
The succesful completion of a big project like this has really helped with my sewing mojo. Nevertheless, I decided to take on a simple and fairly un-selfish project first: another shirt for E.* (my apologies for the focus issues in the close-ups. the light was terrible)

I always keep an eye out for fabrics which would work for fis clothes but menswear stuff is so much harder to find. And his taste isn't very adventurous. So, despite owning an overflowing stash, I immediately bought this cotton flannel when I found it at the market (could be a cotton polyesther blend, the burn test revealed a bit of synthetic in it). It's lovely and soft and has the right weight and hand for a winter shirt. They were selling several designs, so I may go back for more. The only, rather serious, drawback was the width of this fabric: 90 cm. I needed more than 3 m for this single shirt and I'm very good at cutting fabric economically. Luckily, I noticed this issue when buying and got 4 m. And the (lack of) width was reflected in the price.

As usual, I used the shirt sloper I made for E years ago, using the "tailored shirt block" from Winifred Aldrich's Metric Pattern Cutting for Menswear. Like most times, I added a convertible collar instead of a classic collar and stand because E prefers it in wearing. And I completed the look with pockets with flaps. I chose not to make a contrast button band this time (so I had to be extra careful about matching the horizontals at the front).

Of course, I played with the checks a bit. I took care with the placement of the back darts, matched the horizontal lines at side and underarm seams, at the sleeve plackets and, as mentioned before at the front.

The back yoke, cuffs and pockets and flaps were cut on the bias. I stabilized the yoke by giving it an on-grain facing. For the cuffs and flaps, I used fusible interfacing and on-grain facings. Only the pockets themselves at 'unsupported' bias cut bits but I took great care in pressing them in shape and sewing them on the (on-grain) shirt fronts. 

A little detail, because it may be helpful to some of you: I like the look of rounded shirt tail, but I don't like fiddling endlessly to hem them. And I don't like the badly twisting hems you often get on such shapes. I often use this very simple cheat's trick: take (store bought) bias tape and sew along the bottom of the shirt (right sides together) in one of the folds, press to the inside of the shirt and topstitch along the edge. Et voila: an effortlessly curved hem.


* Of course I know a man's shirt doesn't count as an easy project in everyone's book, but I've made so many by now...


December 2, 2012

The big coat reveal!

Here it is! We managed to make use a short sunny moment on an otherwise very rainy day to try and show off my new coat, my redingote.
For this, I decided to go all the way: styling and make-up!

You may remember how it all started with this image in a 1953 issue of sewing magazine Marion. 

I showed you the proces from trying out the original pattern, dismissing it and drafting and developing my own. I explained how to create ease at the armscye without limiting range of movement, and I showed the sewing work in progress. Now, the coat is finished and I've worn it out for the first time...


As discussed before, it has half raglan sleeves end on mid-shoulder where they meet the bodice princess seams. Those princess seams flare out from below the fitted wiastline to form a full skirt. On the side front pieces, there are stick-out pockets. The collar I finally decided upon creates the same high neckline as the shawl collar in the original design. This allowed me to stick with the original button placement: One at the waistline, one below it and one at the collar. With diagonal bound buttonholes. It's short of a convertible collar (if I add a little button and loop, it could be worn closed) with four little darts at the back.


The fabric is a blue-grey wool which has been in my stash for a while, underlined with grey wool, the bodice is interfaced with horsehair canvas and of course the whole thing is lined. 

Interestingly, according to the stern editrix of 1951's Libelle, blue-grey is an excellent colour for a coat because it can be worn with black and with brown... Although the redingote is always a dressy style which makes it less versitile...


And a dressy coat it is... I accesoirized with black for the photoshoot, mostly because it's the only colour in I have all pieces. 
The hat is vintage and was bought in London (at Portobello market, if I remember correctly), the gloves are vintage and from my local market and the purse comes from the same place but was very tired-looking and missing a strap so I did some DIY on it with bits of leather left over from one of my jacket projects. The shoes are the ones I often wear in pictures for the blog and were bought new.